CRM 2011 splash screen has stopped working

Over the weekend I started working on a new virtual image that I could use for CRM 2011 experimenting. For the OS I chose Windows Server 2008 R2 x64. Once the OS and SQL Server 2008 were installed I launched the Windows updates. Obviously there were a lot of updates that needed to be installed so this took a while. I also chose to install the latest service pack for Windows Server (SP1) and Internet Explorer 9. IE9 is of course supported by Dynamics CRM 2011 (and CRM4 since rollup 13). Once all the preparations were done I could finally start with the installation of Dynamics CRM 2011.

I loaded the .ISO file and there came the splash screen of Dynamics CRM 2011.

image

Here I clicked on the first option “Install Microsoft Dynamics CRM 2011 Server”. Boom, immediately my click is followed by an error related to splash.exe saying “Microsoft CRM Splash Screen has stopped working”. This is kind of problematic because it’s blocking me from the installation. Of course I could go and look for the different exe files but that would be too much of a hassle. Here is some more information concerning the error:

image

image

I had read about this problem before on the Microsoft Dynamics CRM community forums. There I couldn’t present a better solution because at that time I didn’t know exactly what was going on. Now I had the problem myself and I just had to find a better workaround!

Immediately I noticed from the error that something was wrong with “mshtml.dll”. It was clear for me that it had something to do with Internet Explorer 9 which I had just installed. Why exactly I can’t say..but Internet Explorer had to go, temporarily (because I really like IE9 and it works perfectly with Dynamics CRM 2011).

So I went to Control Panel and went looking for “Internet Explorer 9”. It’s not in the default list of installed programs. You need to click on “View installed updates” in the left menu.

image

Now you will see “Internet Explorer 9” in the list:

image

Remove this for now and restart the system. Now you will have the previous version of Internet Explorer again.

Now when I run the splash screen again, the install continues like it should be. For me this solves the problem in a decent way. Once the install is done I can just install Internet Explorer 9 again. Of course this is a workaround..I‘ll make sure the bug information is sent to Microsoft.

Preparing your data migration via Data Import Templates

I’m involved in a lot of Dynamics CRM data migration/integration projects. I know how much time it takes to analyse, clean up and import the data into a Dynamics CRM system. If you’ve done this in the past, then you know it can get complicated very quickly. Definitely if you have a lot of relationships.

With this version of Dynamics CRM I was pleased to see that you get some extra help in preparing your data fore the import. With CRM 2011 you can generate templates via the system that will help you with the preparation of your data. These import templates are in an XML format which you can open with Excel.

Generating the import template from an entity view

Generating the templates is done via the CRM 2011 system and it’s very easy. You can generate it per entity or from a more central location. Let’s say I want to retrieve the template for the account entity. I just navigate to the accounts view and click on “Import Data” from the ribbon. In the dropdown list, select “Download Template for Import”.

image

Generating the Import Template via the settings area

If you want, you can also retrieve the templates via the settings area. To do this click on “Data Management” in the left hand navigation. From this view select “Templates for Data Import”.

image

This will open a window with a dropdown where you can select an entity from. Once you have made your selection, click on the download button to download the template.

Opening the Import Template

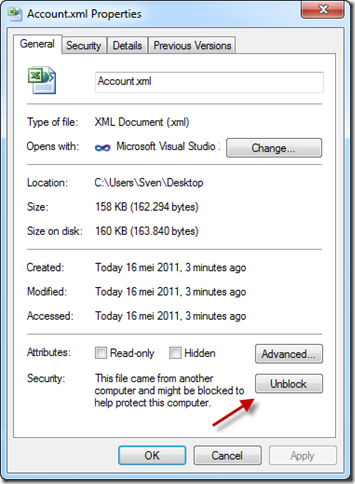
Once this is downloaded, you will notice that it’s an XML file. But no worries, you can open it in Microsoft Excel. At least when you have unblocked the file. This is just a security measure to prevent you from opening unwanted dangerous files. If you don’t unblock the file, you will be get the error message “The file is corrupt and cannot be opened”.

image

To unblock the file, right click on the XML file and open the properties. Here you will see a button to unblock the file.

SNAGHTMLa3656bc

Now you should be able to open the template without a problem and you should see something like this:

image

Inspecting the Data Import Template

This is an extremely handy Excel file to have and it will help you a lot when you are preparing the data. Here is a list of features about the Import template:

  • - The required fields are marked in bold.
  • - The column headers are the same as the display names of your CRM 2011 fields in your entity. Because of this, CRM 2011 will automatically map your data to the correct fields during the data import.
  • - All the fields from your entity are in here, so you don’t  need to open your entity all the time and copy over the fields.
  • - If you click on the header you will see the description of the field.
  • - Option set fields contain a dropdown so you can easily select your value. No incorrect spelling and all the possible values are right there in Excel.

image

All that is left to do is to fill in the Import template and import it using CRM 2011.

Migrating from CRM2011 Online to CRM2011 on premises

A lot of times I read on forums that people are asking if it is possible to migrate their data and customizations from CRM2011 online to CRM2011 on premises. Customizations is not really a problem because you can just import and export the solution. However, migrating data is not so straightforward.

Many companies first start with the CRM2011 Online and then later migrate to CRM2011 on premises. Why do they do this? Here are some possible reasons:
- Because CRM2011 Online might have technical limitations for their specific needs  (not that there are so many differences)
- They didn’t want to pay for server licenses and CALs in the beginning because they were just "trying out" CRM2011.
Now after some time they see what a great product Dynamics CRM is and want to invest in implementing it in their own environment.
- They don’t like the idea of having their company data in the cloud and not in their own environment. (I think we can trust Microsoft
with our data, but you would be surprised how many companies think like this)
- Legal issues: In the past I was working with a customer that wanted to change certain clauses in the contract, because they didn’t agree with certain points. From experience I’ve learned that Microsoft rarely or never changes its contract.

I’m not saying these are all valid reasons to switch. There are also many benefits of choosing for CRM2011 Online, think of scalability for instance.

But if we come back to the question: Is it possible to migrate data and customizations from CRM2011 online to CRM2011 on premises?
Yes it is, no problem! To support this procedure Microsoft has released a handy whitepaper that will guide you step by step through the process
of migrating your online CRM2011 organization to CRM2011 on premises.

You can download the whitepaper via the following link: Microsoft CRM Online Data Migration to Microsoft Dynamics CRM 2011 on-premises

Another solution is to use a third party data migration application like Scribe. Using this application you can connect to your online environment and your on premises environment to copy over the data.

Prototyping CRM2011 applications

In the past when I was mainly working on custom software development projects, I liked to wireframe my application before actually diving into the code or IDE. To create these mockups I used tools like Balsamiq.

Creating mockups can save you a lot of time. Definitely when you need to start from the ground up. You don’t have to worry too much about functionality or the esthetical part of the application. The client will not start complaining that he/she doesn’t like that certain tone of grey that you have used or that a certain button doesn’t behave exactly like it should.

With Dynamics CRM this is of course a different story. First of all, you get already the base functionality straight of the box. Second, there will probably not be a lot of discussion possible concerning the GUI  of the application itself. Normally you stick to what you get out of the box.

However I see some added value in wire framing, prototyping or sketching your CRM2011 application. I will come back to that later on.

I went looking for some decent approach to start prototyping Dynamics CRM applications and my search brought me to mSketch from Magnetism. mSketch is a collection of stencils that can be used to create mockups of CRM2011 applications. All the work is done with Expression Blend 4 SketchFlow. If you don’t have that much experience with this tool, I would really advice you to check it out. This great tool was introduced by Microsoft to shorten the bridge between developer and designer creating WPF or Silverlight applications. The company Magnetism was also no stranger to me because I had been following their blog posts and work on Twitter for a while.

With mSketch you get a solution that you can open with Expression Blend. This solution contains the CRM2011 forms predefined by Magnetism. These forms you can then use to create your own implementation. A nice to have would be to have an installer that would install the stencils as a project type in Expression Blend.

I was quite impressed by the level of detail that the team from Magnetism had put in the creation of these stencils. The ribbon, the tabs, the fields.. a really nice job in total. Magnetism also provided a decent user guide that you can use working with the mSketch stencils. This is always on my checklist when I try new tools or applications: Is there a decent user guide that will actually help me? Yes there is with mSketch, check it out here: http://help.magnetism.co.nz/#getting-started-with-msketch

Here is what the stencils look like inside Expression Blend:

image

Ok, so the stencils gave me a great head start. All I had to do now was to copy one of the forms in my own solution and start the customization of my custom CRM2011 application. Using sketchflow functionality you can define the paths that your application needs to follow. Once completed I just had to push F5 and I had a running prototype of my custom CRM2011 application.

image

Now to come back to a previous discussion, what are the benefits of prototyping your CRM2011 application? Here are some of the benefits I see with prototyping a CRM2011 applications.

1) You can use Expression Blend 4 and the mSketch stencils together with a client to rapidly workout a draft of their CRM2011 application.

2) The client can easily play around with the mockup using the sketchFlow preview created by Expression Blend. This can be deployed to IIS.

3) You don’t need to have CRM2011 installed from the beginning, everything is done in Expression Blend (or IIS for the testing). In cost and performance requirements this makes a big difference.

4) You can limit the discussions concerning the placement of fields, the ribbon, the operations or scripts on a form. You can explain that this is just a draft, a prototype. The full functionality will come later.

More information on the Magnetism mSketch stencils: http://www.magnetism.co.nz/solutionscasestudies/solutions/msketch.aspx
mSketch user guide: http://help.magnetism.co.nz/#getting-started-with-msketch
More information on Expression Blend 4 + SketchFlow: http://www.microsoft.com/expression/products/blend_overview.aspx

How to add Outlook contacts to CRM2011

In this short blog post I would like to discuss the different methods to import your Outlook contacts into Dynamics CRM2011.

Track Outlook contacts

Tracking a contact in CRM 2011 means that you will select your individual contacts and select “Track in CRM” from the context menu. If this operation is completed you will have the same contact created in Dynamics CRM. The benefits are that your contacts are automatically kept in sync. For instance when you change a property of that contact in CRM, this property will be synchronized with the contact in Outlook. If you delete the contact in Dynamics CRM, it will stay available in Outlook. If you delete the contact in Outlook, it will stay in Dynamics CRM.

Steps:

1) Select you contact (one or multiple)

2) Right click and select “Track in CRM”

image

Bulk import

If you want to be able to manage all your contacts in Dynamics CRM, then you can use the “Add contacts” wizard available in the Outlook client. This is a convenient way of moving all your contacts to Dynamics CRM2011. I would advice to set up decent duplicate detection rules to prevent duplicate records.

Steps:

1) In Outlook, go to “File” and click on “CRM”

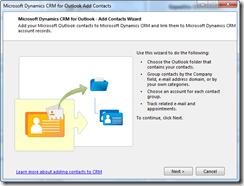
2) Click on “Import Contacts” and select “Add Contacts”

image

3) Now the “Add Contacts” wizard will open

SNAGHTML44782cc

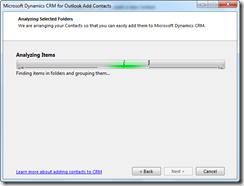
4) Now the wizard will analyze your data

SNAGHTML448f0ab

5) Once the analysis is done, the wizard will show you a list of what is has found. Here you can choose to group your contacts per

- Account (Accounts will be created based on the companies linked to your contacts)

- Email domain

- Category (Category specified in Outlook)

image

Here you can also configure whether or not an account should be created for the companies linked to the contact. Another nice feature is that you can decide here whether or not future communication with these contacts should be synchronized to Dynamics CRM.

6) Finally you can click on the “Add Contacts” button to add your contacts to Dynamics CRM2011.

Problem viewing XML in IE via CRM2011 REST interface

I was trying to view a specific record in an entity set when my Internet Explorer showed the message “Internet Explorer cannot display this feed”.

image

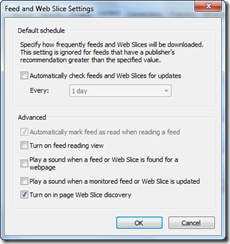
It seems that this has something to do with the build in RSS feed reader in IE. If you want to view the raw XML returned from your REST query without this error, then you need to disable this RSS feed reader. The steps to do this are the following:

1) Go to Tools –> Internet Options

2) Click on the “Content” tab

3) Under the section “Feeds and Web slices”, click “Settings”

4) Uncheck “Turn on feed reading view”

SNAGHTML1392fa6b

5) Click “Ok” and again “Ok”

Now when I try to view the details of a specific account using the following link:
xrmservices/2011/organizationdata.svc/AccountSet(guid’A76567FA-DF4E-E011-9FE0-951FA97376B7′)

I will see something like this

image

Experimenting with CRM2011 adapter for Scribe

Some time ago I explained how you can connect Scribe to CRM2011 Online using the CRM4 adapter.
I also mentioned that the CRM2011 adapter would be released very soon. Well, good news, the adapter has been released.
More information on the release can be found on their website: Scribe software blog

Of course Scribe Soft has like always made all the necessary documentation available to ease the installation process and general use.
You can find the release notes, help file and the adapter installer on the following location: Download CRM2011 Scribe adapter

In this post I would also like to take the opportunity to go shortly over the installation process.

1) First of all you need to make sure that you have the latest Scribe Insight 7.0.2 installed
2) Next make sure to install Windows Identity Framework (WIF), this is something the new adapter requires. You can download this on the following location: Download Windows Identity Framework (WIF)
A little side note concerning Windows Identity Framework, this can’t be installed on Windows XP. If you have this OS and want to use this adapter, then it’s time to upgrade your OS.
3) You also need to make sure .NET 4.0 is installed. This can be downloaded from this location: Download .NET Framework 4
4) Now comes the tricky part, you need to make sure UAC is complete disabled before running the installer. If you don’t
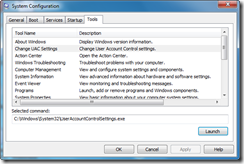
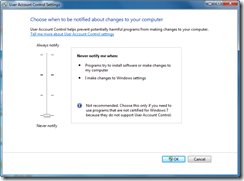
do this, you’ll keep getting the error saying that you need to install the prerequisites. You can turn of UAC via “Run –> msconfig- Tools tab”. Click on "Change UAC Settings" and pull the slider all the way down to the bottom.

SNAGHTMLa9ecbaf

SNAGHTMLa9f109a
5) Now you need to restart your computer
6) Now we’re all set to run the adapter installer.

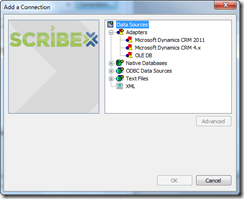
In Scribe Insight you immediately notice that there are two adapters. One for CRM4 and one for CRM2011.

SNAGHTMLa9f90a2

I didn’t have time to do much elaborate testing but when trying to connect to CRM2011 online I noticed that we now need to enter the user friendly name instead of the unique name. The UI during the connection process has also changed a little bit.

image

Up until now I’ve had a very good experience using this adapter, so ScribeSoft, thank you very much, nice work!!

How to connect Scribe to CRM2011 Online

Scribe by default has a CRM adapter to connect to Microsoft Dynamics CRM. Now with the release of CRM2011, Scribe is working on a specific CRM2011 adapter. However, with the current CRM adapter it is also possible to connect to Dynamics CRM 2011 (online and on premises). Just for your information, the new adapter will be ready very soon (end of this month?).

While testing Scribe with CRM 2011 Online I had however a small issue to connect. This problem was quickly resolved by browsing the Scribe knowledge base. So If you are unable to connect to CRM 2011 Online using Scribe, try the following:

You need to add two strings to following registry locations (depending on your OS):

32-bit Scribe Servers

HKLM\SOFTWARE\Scribe\Adapters\DynamicCRMAdapter

64-bit Scribe Servers

HKLM\SOFTWARE\Wow6432Node\Scribe\Adapters\DynamicCRMAdapter

Here are the things you need to add:

String Value Name:  CrmOnlineUrlOverride

Value:   https://dev.crm4.dynamics.com

String Value Name:  PassportPartner

Value:  crm4.dynamics.com

If there are any problems, let me know

How to disable the Get Started pane in CRM2011

You probably have noticed that CRM2011 now comes with a very handy pane at the top showing tips&tricks, videos etc. to help you work with CRM2011. This is truly a great help if you are just getting started with CRM2011. If you however have a little more experience with CRM2011 and you were wondering if you could disable or hide this pane. Yes you can! You can do it on a personal or user level or organizational (then it will be disabled for all the users in CRM2011 regardless of their personal setting).

If you don’t know what I’m talking about, see the image below Glimlach

image

Disable it on user level

Go  to File – Options

image

There on the “General tab” you change the setting.

image

Disable it on organization level

Go to Settings – Administration – System Settings

image

And again on the “General tab” you can change the setting

image

Creating a calculated field in Dynamics CRM2011

In this short post I’ll explain to you how you can create a calculated field in dynamics CRM2011. It’s actually just the same as in CRM4. The only thing now is that we have to use web resources. Web resources is new in CRM2011 and needs to be used whenever it comes down to using resources (like JavaScript) in dynamics CRM.

Ok lets start:

1) First create some fields. For this demo I’ll use: val1, val2 and result

image

2) The calculation will be a simple multiplication. I’ll multiply val1 and val2 and output the result in the result field.

3) Now we need to create the JavaScript that will do the actual calculation of the fields.

   1: function calculate()

   2: {

   3:     var val1 = Xrm.Page.entity.attributes.get['new_val1'].getValue();

   4:     var val2 = Xrm.Page.entity.attributes.get['new_val2'].getValue();

   5:     

   6:     if(val1==null)return;

   7:     if(val2==null)return;

   8:  

   9:     var result = val1 * val2;

  10:     Xrm.Page.entity.attributes.get['new_result'].setValue(result);

  11: }

Mind the new Xrm page model functions that I’m using. More information can be found on MSDN.

A little more information on the JScript. First I grab the data from both fields, check if they are not null and then do the actual calculation. Finally I set the result for the “calculated field”.

4) Now we need to add the JavaScript as a Web Resource. Go to the Web Resource section (Settings – customizations – Customize the System – Web Resources).

5) Add a new Web Resource. Here you can give a name, description etc. For the “type”, select Script (JScript). Finally click on the button “Text Editor” and add the code we’ve created above.

image

6) Once the Web Resource is created and published we can use it in our Account form where the custom fields are located.

7) Customize the form and select “Form Properties”. We first need to make the Web Resource available in this specific form.

8 ) Under the Events tab, add the Web Resource that we just created.

image

9) All that’s left to do is to configure the onChange events for the two fields and we’re done. Doubleclick on the field val1 and val2, go to the Events tab and configure the onChange event. The final result for each field should look like this:

image

10) Publish the form and you’re ready for testing.

« Vorige pagina